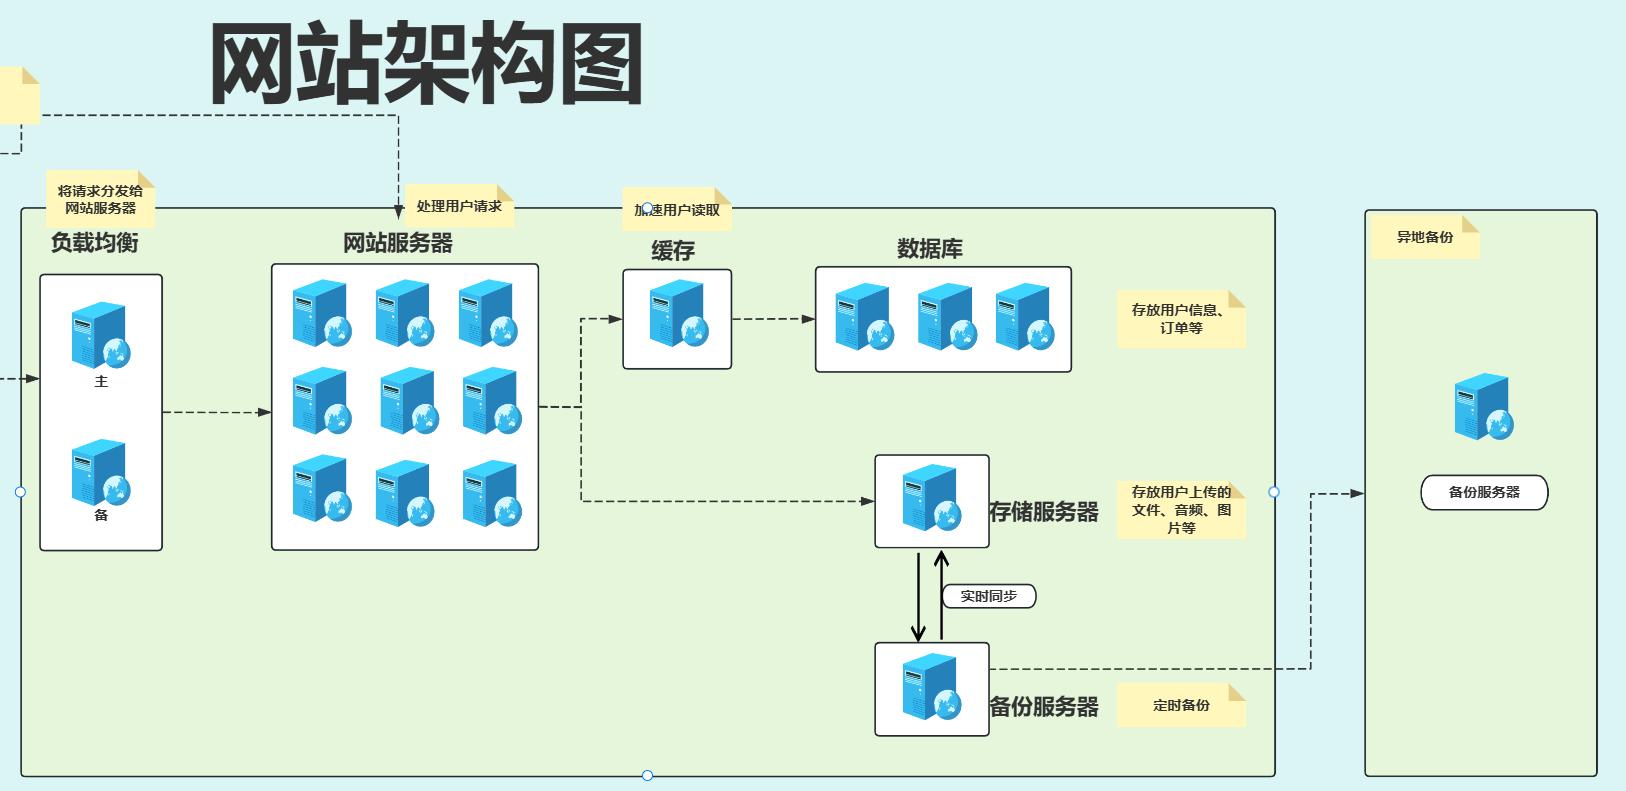
架构图 部署流程 #检查是否安装rsync
[root@backup ~]# rpm -qa |grep rsync
rsync-help-3.1.3-7.ky10.noarch
rsync-3.1.3-7.ky10.x86_64
#编写配置文件-----------------------------------
[root@backup ~]# vim /etc/rsyncd.conf
##rsyncd.conf start##
fake super =yes
uid = rsync
gid = rsync
use chroot = no
max connections = 2000
timeout = 600
pid file = /var/run/rsyncd.pid
lock file = /var/run/rsync.lock
log file = /var/log/rsyncd.log
#hosts allow = 172.16.1.0/24
#hosts deny = *
ignore-errors
read only = no
list = yes
auth users = rsync_backup
secrets file = /etc/rsync.password
#####################################
[data]
path = /data
comment = Public backup module
[backup]
path = /backup
comment = Public backup module
#---------------------------------------------------------
#创建虚拟用户
[root@backup ~]# useradd -M -s /sbin/nologin rsync
#创建密码文件并修改权限
[root@backup ~]# vim /etc/rsync.password
rsync_backup:1
[root@backup ~]# chmod 600 /etc/rsync.password
#创建data目录并修改所有者
[root@backup ~]# mkdir -p /data
[root@backup ~]# chown rsync.rsync /data/
[root@backup ~]# ll -d /data/
drwxr-xr-x 2 rsync rsync 6 10月 17 10:29 /data/
sudo mkdir -p /backup
sudo chown rsync.rsync /backup
sudo chmod 755 /backup
#启动服务
[root@backup ~]# systemctl enable --now rsyncd
[root@backup ~]# systemctl restart rsyncd
[root@backup ~]# systemctl status rsyncd
● rsyncd.service - fast remote file copy program daemon
Loaded: loaded (/usr/lib/systemd/system/rsyncd.service; enabled; vendor preset: disable>
Active: active (running) since Fri 2025-10-17 10:33:10 CST; 9s ago
Main PID: 58742 (rsync)
Tasks: 1
Memory: 196.0K
CGroup: /system.slice/rsyncd.service
└─58742 /usr/bin/rsync --daemon --no-detach
10月 17 10:33:10 backup systemd[1]: rsyncd.service: Succeeded.
10月 17 10:33:10 backup systemd[1]: Stopped fast remote file copy program daemon.
10月 17 10:33:10 backup systemd[1]: Started fast remote file copy program daemon.
#连接测试
[root@backup ~]# rsync -avz /etc/hostname rsync_backup@10.0.0.41::data
Password:
sending incremental file list
hostname
sent 102 bytes received 43 bytes 96.67 bytes/sec
total size is 7 speedup is 0.05
[root@backup ~]# echo $?
0 #0为连接成功,非0连接失败echo '1' >/etc/rsync.client
chmod 600 /etc/rsync.client
yum -y install rpcbind nfs-utils
vim /etc/exports
/nfsdata/ 172.16.1.0/24(rw,all_squash,anonuid=1999,anongid=1999)
groupadd -g 1999 www
useradd -M -s /sbin/nologin -u 1999 -g www www
mkdir -p /nfsdata
systemctl enable --now rpcbind nfs
showmount -e [存储服务器IP]yum -y install rpcbind nfs-utils
groupadd -g 1999 www
useradd -M -s /sbin/nologin -u 1999 -g www www
mkdir -p /upload
chown www.www /upload/
vim /etc/fstab
172.16.1.31:/nfsdata /upload nfs defaults 0 0
mount -a
#1.检查与安装lsync
rpm -qa |grep lsyncd
yum -y install lsyncd
[root@bfs01 scripts]# rpm -ql lsyncd
/etc/logrotate.d/lsyncd
/etc/lsyncd.conf
/etc/sysconfig/lsyncd
/usr/bin/lsyncd
/usr/lib/sysctl.d/50-lsyncd.conf
/usr/lib/systemd/system/lsyncd.service
#2.编写配置文件
vim /etc/lsyncd.conf

settings {
   logfile    = "/var/log/lsyncd.log",
   pidfile    = "/var/run/lsyncd.pid",
   statusFile = "/var/log/lsyncd.status",
   nodaemon   = true,
   maxProcesses = 2
}

sync {
    default.rsync,
    source    = "/nfsdata/",
    target    = "rsync_backup@172.16.1.41::backup",
    delay     = 5,
    delete    = true,
    rsync = {
        binary   = "/usr/bin/rsync",
        archive  = true,
        compress = true,
        password_file = "/etc/rsync.client"
    }
}

[root@bfs01 ~]# systemctl enable --now lsyncd.service
Created symlink /etc/systemd/system/multi-user.target.wants/lsyncd.service → /usr/lib/systemd/system/lsyncd.service.
[root@bfs01 ~]# systemctl status lsyncd.service
● lsyncd.service - Live Syncing (Mirror) Daemon
   Loaded: loaded (/usr/lib/systemd/system/lsyncd.service; enabled; vendor preset: disabled)
   Active: active (running) since Tue 2025-10-21 17:32:17 CST; 1s ago
     Docs: man:lsyncd(1)
           https://axkibe.github.io/lsyncd/
 Main PID: 73621 (lsyncd)
    Tasks: 1
   Memory: 468.0K
   CGroup: /system.slice/lsyncd.service
           └─73621 /usr/bin/lsyncd -nodaemon /etc/lsyncd.conf

10月 21 17:32:17 bfs01 systemd[1]: Started Live Syncing (Mirror) Daemon.
10月 21 17:32:17 bfs01 lsyncd[73621]: 17:32:17 Normal: --- Startup ---
10月 21 17:32:17 bfs01 lsyncd[73621]: 17:32:17 Normal: recursive startup rsync: /nfsdata/ -> >
10月 21 17:32:17 bfs01 lsyncd[73622]: rsync: failed to write xattr user.rsync.%stat for "." (>
10月 21 17:32:17 bfs01 lsyncd[73622]: rsync: failed to set times on "." (in nfsbackup): Opera>
10月 21 17:32:17 bfs01 lsyncd[73622]: rsync: delete_file: unlink(ifcfg-ens34) failed: Permiss>
10月 21 17:32:17 bfs01 lsyncd[73622]: rsync: delete_file: unlink(ifcfg-ens33) failed: Permiss>
10月 21 17:32:17 bfs01 lsyncd[73622]: rsync: mkstemp ".q.txt.dNG32S" (in nfsbackup) failed: P>
10月 21 17:32:17 bfs01 lsyncd[73622]: rsync error: some files/attrs were not transferred (see>
10月 21 17:32:17 bfs01 lsyncd[73621]: 17:32:17 Normal: Startup of /nfsdata/ -> rsync_backup@1>
[root@bfs01 ~]#
yum -y install redis
vim /etc/redis.conf
egrep -n '^bind|^protect' /etc/redis.conf
87:bind 127.0.0.1 -::1 172.16.1.51 #在后面添加数据库内网IP
111:protected-mode no #这里修改为no
systemctl enable --now redis
--------------------------------------------
#1.安装数据库
yum install -y mariadb-server
#2.启动数据库
systemctl enable --now mariadb
#3.检查数据库
ss -tunlp |grep mysql
ps -ef |grep mysql
#4.初始化数据库
mysql_secure_installation
Enter current password for root (enter for none): 回车
Set root password? [Y/n] Y 设置密码
New password: 输入密码
Re-enter new password: 再次输入
提示 Password updated successfully! Reloading privilege tables... Success!
Remove anonymous users? [Y/n] Y 删除数据库中的匿名用户(无用户名的用户,易导致安全问题)
Disallow root login remotely? [Y/n] Y 是否禁止 root 远程登录
Remove test database and access to it? [Y/n] Y 是否删除 test 测试用的数据库
Reload privilege tables now? [Y/n] Y 是否更新权限信息表
#说明:
#1.Linux的root用户用于进入和管理整个Linux系统
#2.数据库的root用户仅仅用于管理Mysql数据库
#5.进入数据库,创建库表
mysql -uroot -p
#创建wordpress数据库
create database wordpress;
#添加用户管理wp数据库,白名单只能从内网172.16.1.0/24登录与访问
grant all on wordpress.* to 'blog'@'172.16.1.%' identified by '1';
grant all on wordpress.* to 'blog'@'localhost' identified by '1';
#更新权限信息
flush privileges;
#退出
quit;
#安装php的redis插件
php go-XXX.php
pecl install redis
#在php配置文件中添加redis.so路径
redis.so文件位置:/usr/lib64/php/modules/redis.so
echo 'extension=redis.so' >>/etc/php.ini
systemctl restart php-fpm.service
php -m |grep redis
回显要有redis
-----------------------------------
mkdir -p /app/code
解压代码 记得该chown -R nginx.nginx

vim /etc/nginx/conf.d/kodbox.conf

server {
  listen 80;
  server_name kodbox.kebumt.cn;
  client_max_body_size 50M;
  root /app/code/kodbox;
  location  / {
    index index.php;
  }

  location ~ \.php$ {
    fastcgi_pass  127.0.0.1:9000;
    fastcgi_index  index.php;
    fastcgi_param  SCRIPT_FILENAME  $document_root$fastcgi_script_name;
    include    fastcgi_params;
  }
}

域名连接测试
负载均衡+高可用
#1.用nginx官方源
vim /etc/yum.repos.d/nginx.repo
[nginx-stable]
name=nginx stable repo
baseurl=http://nginx.org/packages/centos/7/$basearch/
gpgcheck=1
enabled=1
gpgkey=https://nginx.org/keys/nginx_signing.key
module_hotfixes=true
#2.安装nginx
yum install -y nginx
#3.启动nginx
systemctl enable --now nginx
systemctl restart nginx
systemctl status nginx
vim /etc/nginx/conf.d/kodbox.kebumt.cn.conf
upstream kodbox_group {
server 10.0.0.7:80;
server 10.0.0.8:80;
}
server {
listen 80;
server_name kodbox.kebumt.cn; #域名
error_log /var/log/nginx/kodbox_error.log;
access_log /var/log/nginx/kodbox_access.log;
location / {
proxy_pass http://kodbox_group; #转发到
web组
proxy_set_header Host $host; #转发到后
端节点请求的请求头
proxy_set_header X-Real-Ip $remote_addr;
proxy_set_header X-Forwarded-For $proxy_add_x_forwarded_for;
}
}
------------------------------
#高可用
1.安装高可用软件keepalived
yum -y install keepalived
2.编写检查nginx进程脚本
vim /server/scripts/check_ngx.sh
#!/bin/bash
#1.vars
name=nginx
#2.
count=`ps -ef | grep nginx |egrep -v 'grep|color' |wc -l`
if [ $count -eq 0 ];then
systemctl stop keepalived
#配置邮件,切换节点通知
fi
3.编写主备配置文件,配置如下图
vim /etc/keepalived/keepalived.conf
global_defs {
router_id 10.0.0.3
}
vrrp_script check_ngx.sh {
script /server/scripts/check_ngx.sh
interval 2
weight 1
user root
}
vrrp_instance vip_3 {
state MASTER
priority 100
virtual_router_id 51
interface ens33
advert_int 1
authentication {
auth_type PASS
auth_pass 1111
}
virtual_ipaddress {
10.0.0.3 dev ens33 label ens33:0
}
track_script {
check_ngx.sh
}
}
#https
vim /etc/nginx/conf.d/ssl.kodbox.conf

server {
  listen 80;
  server_name ssl.kodbox;
  return 302 https://ssl.kodbox$request_uri;

}

server {
  listen 443 ssl;
  server_name ssl.kodbox;
  root /app/code/kodbox;
  ssl_certificate     /etc/nginx/ssl/kebumt.cn.pem;
  ssl_certificate_key /etc/nginx/ssl/kebumt.cn.key;
  location / {
    index index.html;
  }

}


将密钥传到/etc/nginx/ssl目录下,负载和web都要

#负载转发
upstream kodbox_group {
  server 10.0.0.7:443;
  server 10.0.0.8:443;
}
server {
  listen 80;   #通过http访问的会跳转到443变成https
  server_name kodbox.kebumt.cn;
  return 302 https://kodbox.kebumt.cn$request_uri;
}
server {
  listen 443 ssl;
  server_name kodbox.kebumt.cn;   #域名
  ssl_certificate /etc/nginx/ssl/kebumt.cn.pem;
  ssl_certificate_key /etc/nginx/ssl/kebumt.cn.key;
  error_log /var/log/nginx/kodbox_error.log;
  access_log /var/log/nginx/kodbox_access.log;

  location / {
    proxy_pass https://kodbox_group; #转发到web组
    proxy_set_header Host $host;  #转发到后端节点请求的请求头
    proxy_set_header X-Real-Ip $remote_addr;
    proxy_set_header X-Forwarded-For $proxy_add_x_forwarded_for;
  }
}
server {
  listen 443 ssl;
  server_name kodbox.kebumt.cn;
  client_max_body_size 50M;
  ssl_certificate /etc/nginx/ssl/kebumt.cn.pem;
  ssl_certificate_key /etc/nginx/ssl/kebumt.cn.key;
  root /app/code/kodbox;
  location  / {
    index index.php;
  }
本文采用 CC BY-NC-SA 4.0 许可协议,转载请注明出处。
C


评论交流
欢迎留下你的想法